

Herd Grouping - Activating
ACTIVATE HERD GROUPING
To set up your herd groups:
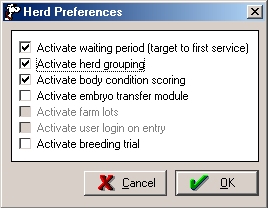
- Before herd groups can be named, the herd grouping option has to be activated first. Go to File, Properties, Preferences, with your mouse click in the box that says Activate herd grouping. A check mark will now appear in this box, then click OK.
- To add the names of the groups go to File, Properties, herd codes, herd groups, click add (Must be a name, not a number). Fill in the name and the milking frequency of the group (you may leave the previous milking and number of milkings weighed blank). Once this is completed, click OK. Define all groups here.
- To move animals into their proper groups, go to Entries, Movement
- The first time: where it says Select animals from group, this remains blank. Select the desired group that you wish to place animals in by choosing the name of the group from where it says Move to group.
- Select animals to be moved by highlighting them in the green list and click add or double click on the number. You can also type their number and press enter on your keyboard. This will move the animal's number to the right hand side of the screen and will appear in the blue box.
- Animals on the right side (blue box) will be moved to the group selected. When all required animals are present, click on OK (this will exit this screen at the same time) or press F9 on your keyboard (the screen will not be exited if F9 is clicked).
